Rear Brake Shoe Renewal
For those of you with crappy brakes, this tutorial is identical for both front and rear brakes. The procedure of renewing your brakes is pretty simple. You should set aside a few hours for your first atttempt. This process will involve completely removing a wheel from your bike, so make sure the bike is jacked off the ground and is stable enough to torque the large retaining nuts on the hub. A few ideas for those of you who do not have a means of lifting the bike off the ground, I have a few tips. Place a milk carton under your bike's tail, and shim it until the rear wheel lifts off the ground. The centerstand should act as a pivot, keeping it stable while you work on the brakes. The front brake should be a breeze as long as you have a centerstand. If you have a sidestand, however, your job is now more difficult. You will need two milkcrates for a a sidestand bike. Put one under the floorboards between the sidestand and the rear brake pedal and the other under the tail. You will have to be careful with a sidestand bike, since it will tip easily when it is on milkcrates.
I performed this procedure on an engine that had been dropped out of the body. The wheel was removed for clarity sake, but you do not need to remove the engine or wheel to perform this operation -- in fact I advise against it unless you have other issues with your bike. Though it seems counter-intuitive to install a cotter pin this way, it does in fact strengthen the retaining force of the pin.
Tools & Parts Needed
Brake Shoe Set
2 Brake Shoe Retaining Clips
Wire Brush
22mm Socket
Ratchet Set (Torque wrench reccomended)
Shop Towels
Mallet or Impact Wrench
Two Small Spanner wrenches (7mm and 8mm)
Visegrips
Needle Nose Pliers
Small Split Pin (1/8" X 2")
Pair of Latex Surgical Gloves
Procedure
|
|
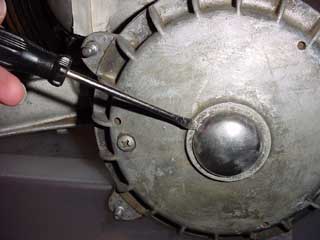
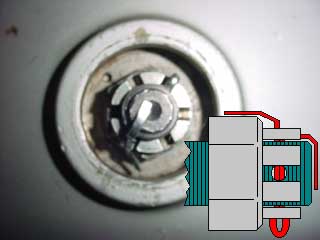
Step 1
Start by prising off the hub dust cover. Underneath the cover is a strange nut...
|
|
|
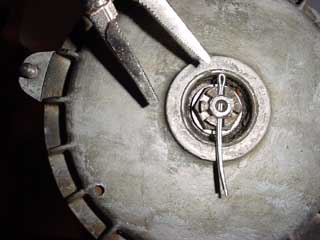
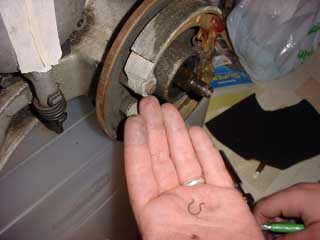
Step 2
This nut is called a "castellated nut". It has grooves in the nut head to grab into a split pin. This kind of nut resists backing off as long as the cotter pin is installed. So begin by bending and removing the pin from its seat...
|
|
|
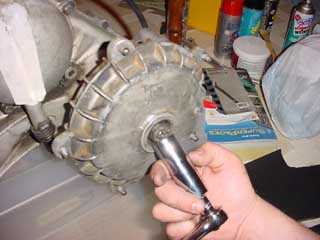
Step 3
Now get the ratchet and 22mm Driver and take that castellated nut off the axle. Not so easy huh? My only advice on removing this pesky nut is to either use and impact wrench or grab a mallet and whack the end of the ratchet to shock it off. Sometimes the nut is easy to get off, if you have one like that, lucky you.
|
|
|
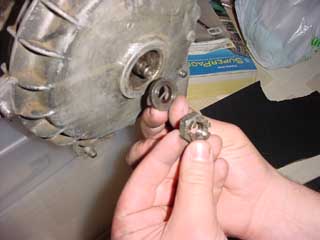
Step 4
Assuming your bike hasn't fallen off the jacks and everything went well, you should end up with these two pieces in your hands, put them aside (in a safe place where you can find them again).
|
|
|
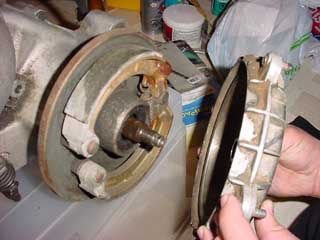
Step 5
Pull away the hub (and wheel) to reveal the brake compartment. Take care that you pull the hub away as straight as possible, you don't want oil on anything to do with the brakes.
|
|
|
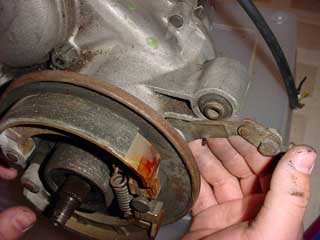
Step 6
Prise off both clips on the brake pivots, replace these with new ones every time you change the brakes. This will allow you to start prying the brakes off the pivots.
|
|
|
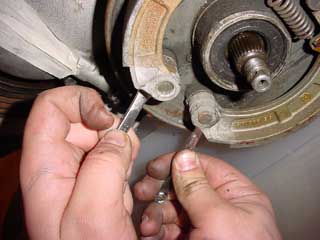
Step 7
Place two spanners under the pivot points and wrest the brake shoes off the pivots. The shoes and spring will collapse, allowing you to remove the brakes and change them out. Another user recommended putting the blade of a screwdriver between the operating cam and the brake shoe and twisting.
|
|
|
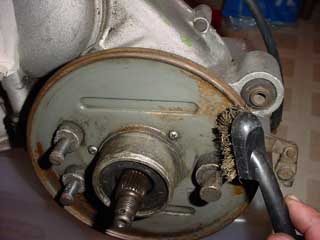
Step 8
While you have the brakes off, why not polish the backing plate with a wire brush?
|
|
|
Step 9
Put on the gloves and place the spring into the new set of brake shoes. Reinstall the brake shoes by clipping the shoes onto the operating cam and pushing them onto the pivots.
|
|
|
|
Step 10
Reinstall the clips on the brakes and replace the cover. Place the plain washer around the axle and screw the castellated nut back onto the axle. Use a torque wrench and torque the nut to 7.5-9.0 kgf m (54.3-65.1 lbf ft) -- translation: as tight as you can get it!
|
|
|
Step 11
Bend the split pin as shown to assure your safety on the road. DO NOT LEAVE THIS PART OUT! You may need to clip the split pin to make it fit the way it is shown.
|


All Material Copyright 2001-2026 by Richard Hoar. Use at your own risk.
|