Cleaning The Top-End (Decoking)
This tutorial will demonstrate the process of decoking the top end, or removing the carbon deposits from the engine. This is a standard maintenance and should be performed every 6000km (4000 miles), or every year for machines that are never heating up (quick hops about town). It will be virtually impossible to get all the crud off of the engine parts, so don't be overly compulsive about it. Though the process seems daunting, like putting a wheel together, it is one of those chores that you will be able to fly through after your first go. I would give it a few hours for the first time. I hear some asking, "why should I do this; my engine runs fine?" This procedure is important because of the heat and power restrictions a two stroke engine has to contend with. By letting junk build up on the piston, cylinder and head, you are effectively decreasing the fuel capacity of your motor (ie 200 cc to something slightly less). Since waste carbon, commonly called coke, is left from burning two stroke oil, the engine will suffer from an overly "rich" condition and generally run badly or start hard. A few signs that your top-end may need to be cleaned are oily, constantly fouling spark plugs; hard starting (more than 4 kicks) and lots of exhaust smoke. I would reccomend you preced this operation with a carb rebuild when attempting for the first time. Synthetic lubricants will increase the period of this procedure, but it is still worthwhile to consider attempting every year. This procedure is best done in a covered, well lit area (like a garage) so no crap gets into your top end.
Tools & Parts Needed
Multi Screwdriver
Spark Plug Wrench
Disposeable Shop Towels
A can of Carb Cleaner
A Tube of Anti-Sieze Lubricant
13mm and 11mm Deep Socket
Torque Wrench (Absolutely neccessary, DO NOT perform without this item)
Plastic Bondo (Body Filler) Scraper
Plastic "Wire" Brush
Tub of All-Purpose / Bearing Grease ("Green Goop")
Procedure
|
|
Step 1
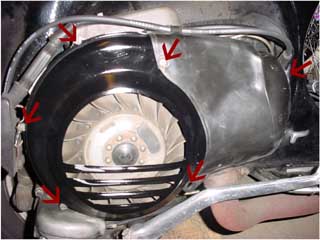
Undo the arrowed screws and the flywheel shroud will fall right off. Put the shroud and all the little screws in a safe place (or sand it down and paint it if you have a day or two).
|
|
|
Step 2
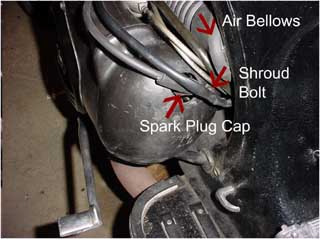
Gently prise off the spark plug connector and put it one side. Undo the Shroud bolt right next to the spark plug. Unhook the air bellows from the frame and push it to one side. Slide the cylinder shroud off of the engine by pulling towards the front of the bike. You should now be able to see the cylinder. Remove the sparkplug with the sparkplug wrench.
|
|
|
Step 3
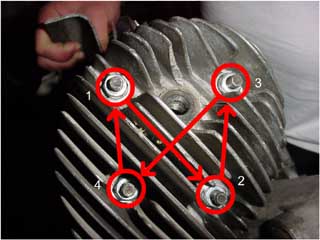
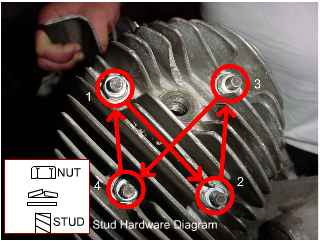
Remove the nuts by loosening them slowly in this order. Do a quarter turn, go to the next, quarter turn, next, quarter turn, next, etc. until the nuts are removed. This will take a while, but you risk bending the aluminum head if you don't do them in small steps and in order. The same is true for tightening. Carefully collect the hardware and remove the cylinder head.
|
|
|
Step 4
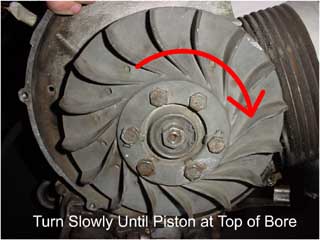
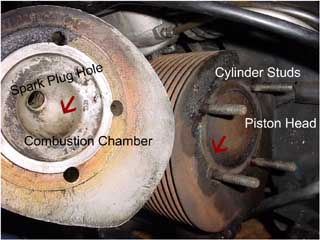
Since the flywheel is connected to the crank, you can raise and lower the piston simply by turning the flywheel by hand. To start, position the piston to the top of the bore. You are now ready to start cleaning.
|
|
|
Step 5
With the piston at the top of the bore, rub a ring of all purpose grease around the circumference of the piston head. This will catch any little chunks of carbon. If your piston is totally coated in carbon (like mine) use a plastic scraper to get most of the crud off. When you are done scraping, remove the remainder with a plastic "wire" brush. Metal is NOT reccomended.
|

|
|
Step 6
Wipe off all of the grease from the scraping. To clean the sides of the piston and bore, apply another ring of grease and turn the flywheel slowly. The piston will recede into the bore. Go halfway down, rub away some of the grease with a disposeable towel then go to the bottom and repeat. Keep re-applying grease until the metal on the bore is clean.
|

|
|
Step 7
To clean the cylinder head, use copious amounts of carb cleaner and shop towel, the carbon doesn't tend to stick quite as badly to the head and there's more room to work on it. This part, if any, should be sparkly aluminum grey by the end. Once you finish cleaning the head, spread some anti sieze lubricant (stops threads from stripping) on the thread on the cylinder studs.
|
|
|
Step 8
Put the head back on. Hand tighten the screws in order until each becomes snug. Then, using the quarter turn method, tighten the screws with a torque wrench, in order, using a torque of 1.7-2.2 kgf m (12.30-15.91 lbf ft). Re assemble the bodywork in the reverse order. Install the Spark Plug last and reconnect the bellows be stretching the rubber around the lip on the frame.
|
Once all the panels are back on the bike, kick start the engine as usual. The engine should roar to life after a few kicks. If the kickstart lever doesn't feel firm or if the the engine will only run when the choke is turned on, you have an air leak. This will probably be caused by the sparkplug not being tight enough (*The plug is touchy, don't tighten it too strongly or you will rip the threads out of the aluminum*). If you did rip the threads, there will be a leak around the damage -- take the piece to a machine shop and have them install a "helicoil insert", and remind them of the fact it is a cylinder head so they can use a high heat transfer coil. This will replace the old threads and make a much stronger thread. If the plug IS seated properly, the cylinder head may be warped from improper tightening. IF YOU FOLLOW THE RULES, THIS WILL NOT HAPPEN. However, if it is warped, you will need some 400 grit wet/dry sandpaper and a piece of glass. Tape the paper to the glass and wet it. Hold the cylinder head in your palm and rotate the bottom on the paper until it is flat. Once you are done remount it and try again. This maintenance should be done yearly for year round riders, every 6000km (4000 miles) for the "rally only" types.


All Material Copyright 2001-2026 by Richard Hoar. Use at your own risk.
|