Splitting the Engine Case
Virtually every Vespa motor uses a split case system with a separate cover for the clutch housing. In order to repair the engine's internal components, you must split the cases by removing parts in order. Prior to splitting the case you should always drop the engine out of the frame, so you are comfortable and have access to all sides of the engine. The cases house mostly gearbox components, bearings and seals as well as the crankshaft and kickstart. If you are having problems with these components it is recommended that you buy all of the components in the list below along with the parts you suspect are worn. The cruciform is the most common problem on a Vespa and can be remedied with ease once the cases are apart. Work slowly and in a clean environment for best results. Do not work outside if at all possible, for this will often cause rushed repairs. Wear work clothes that you are not interested in keeping as the engine is usually oily and dirty from road grime. if at all possible, remove loose road dirt from the cases before opening to avoid contamination of the engine.
Tools & Parts Needed
Flywheel Puller (Available at scooter shops)
A Small Punch
Assembly Grease (Thick, high-temperature grease)
Socket Set (7-22mm)
Spanner set (7-22mm)
Long Handled Screwdriver Set
Spark Plug Wrench
Disposeable Shop Towels
A can of Carb Cleaner
A can of WD-40
Split Pin for Rear hub
Metal Hammer
Visegrips
Needlenose pliers
A length of pipe larger than the diameter the handle of your socket driver
A Large Chisel (see below)
A large bag and electrical tape
A Clutch Cable inner
A Rear Brake Cable Inner
Buy the following parts at your discretion
Set of Woodruff Keys (Flywheel and Clutch side)
Rear brake Shoes
Gaskets: Case gasket, Air Box to Case gasket, Selector Box Gasket, Clutch Cover O-Ring, Cylinder to Base Gasket, Oil Drain Plug Gasket.
Seals: Flywheel Side Seal, Clutch Side Seal, Rear hub Seal
Disassembly
|
|
Step 1
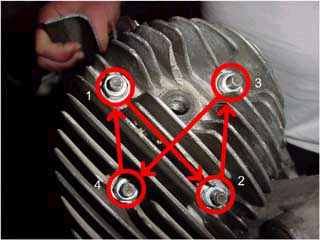
Remove the nuts by loosening them slowly in this order. Do a quarter turn, go to the next, quarter turn, next, quarter turn, next, etc. until the nuts are removed. This will take a while, but you risk bending the aluminum head if you don't do them in small steps and in order. The same is true for tightening. Carefully collect the hardware and remove the cylinder head.
|
|
|
Step 2
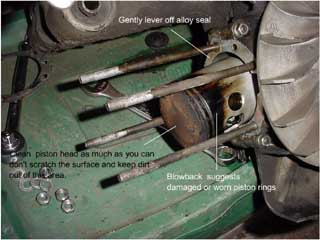
Remove the Cylinder Head; then remove the Cylinder Barrel, exposing the piston. Note imperfections on the piston. For example, the large black band directly below the piston rings suggests worn piston rings. See below for tips on repair.
Prise the alloy cylinder seal off the edge of the engine case.
|
|
|
Step 3
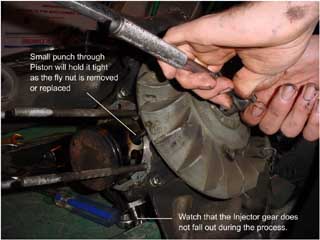
Place a small metal punch lengthwise through wrist pin ensuring both sides touch the edges of the case. Rotate the flywheel until it is held tight by the punch. Using a socket, remove the flywheel nut. You may need more leverage so use a pipe length on the end of a socket. It is not adviseable to use a hammer.
|

|
|
Step 4
Remove the punch from the piston. Lightly oil the flywheel puller threads and thread the tool into the center of the flywheel. Get about 5 or 6 threads of the tool into the flywheel. Using a spanner and a socket, tighten with the socket and anchor with the spanner (pictured).
|
|
|
Step 5
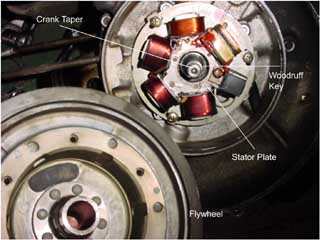
The flywheel will pull away from the crank taper revealing the stator, taper and woodruff key. These are the key timing components of the engine.
|
|
|
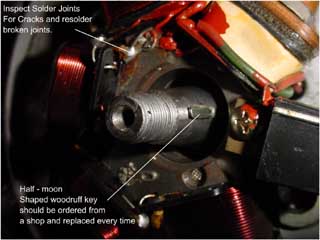
Step 6
Pull the half-moon shaped woodruff key and inspect it for shearing (deep line in the metal), if there is no scoring then you may reuse it. Look for cold solder joints on the stator (disconnected or cracked solder joints) and repair them as neccessary. The picture depicts an example of a good solder joint.
|
|
|
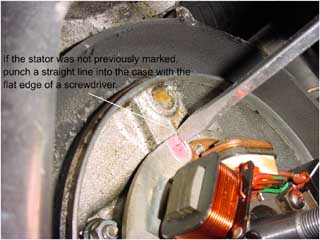
Step 7
Though most P-series Vespas come with timing marks cast into the engine, it is a good idea to make a thinner line with a screwdriver, so you can get it dead on. A screwdriver and a hammer tap on the edge of the stator plate and case will quickly mark and accurate stock point.
|
|
|
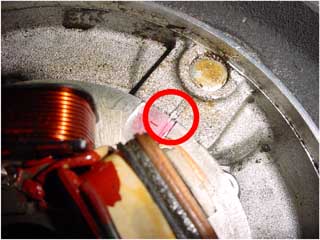
Step 8
Here is the result. When realigning the stator, use this new mark as a base timing point.
|
|
|
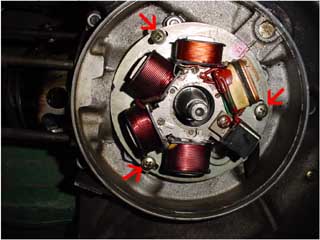
Step 9
Remove the arrowed screws to get behind the stator plate. These screws strip easily, so push down on the screwdriver and use the proper sized driver. If you strip a screw, a pair of Visegrips will loosen it. Always replace stripped screws.
|
|
|
Step 10
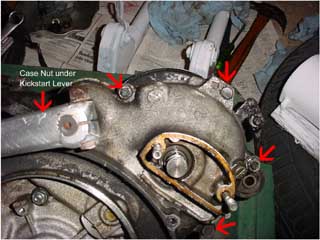
Carefully dangle the stator from the case. NEVER ROLL THE CASE ONTO THE STATOR. There are a number of case screws to loosen (arrowed). Loosen them and store them somewhere safe. Many screws have a complimenting stud that will fall out as they are removed.
|
|
|
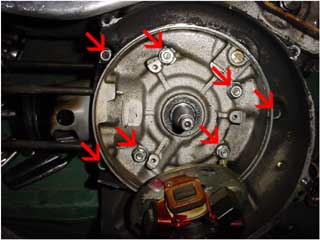
Step 11
There are a number of case screws to loosen (arrowed). Loosen them and store them somewhere safe. Many screws have a complimenting stud that will fall out as they are removed. The stud and nut under the flywheel is called the long case stud. It tends to rust and seize. If yours is siezed, order a new one from a scooter shop.
|
|
|
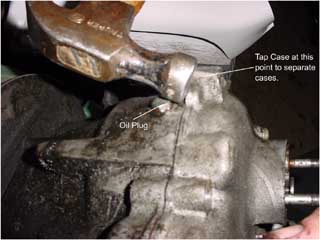
Step 12
With all the nuts removed you are ready to split the cases. Tap the point next to the oil plug (pictured) with a rubber mallet and a piece of wood and the cases will nudge apart. DO NOT move the kickstart lever. You should be able to simply pull away the case to reveal the gears. The picture shown depicts a metal hammer being used. After great debate, I have decided to amend this section. ***Ignore the metal hammer an use a rubber one instead. You risk damaging the cases with a metal hammer.***
|
|
|
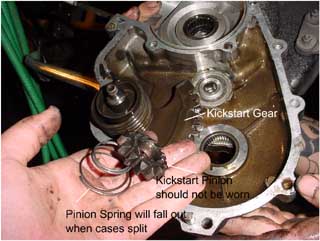
Step 13
A spring and the kickstart pinion will usually fall out of the case. collect them and inspect the pinion for wear. If any teeth are missing, renew the gear. The one pictured is not worn.
|
Reassembly
|
|
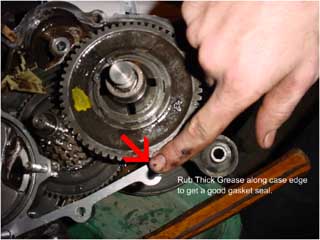
Step 1
Pull the old case gasket and rub remenants away with a wire brush. Rub a ring of assembly grease around the case edge and replace the gasket with a new one. If the old gasket is not torn, it may be reused in a pinch. Always renew the case gasket while the engine is open.
|
|
|
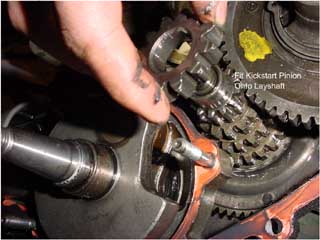
Step 15
Replace the kickstart pinion onto the layshaft with the teeth facing down. (pictured)
|
|
|
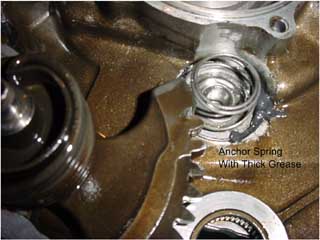
Step 16
Kickstart pinion Spring should be retained with a large glob of assembly grease, now flip the case and place it onto the other case half. Watch that the spring does not fall. press the cases together, moving the kickstart lever to mesh the gears. Tap the cases on any flat spot to push them together. Now follow the disassembly instructions to finish the job.
|
So now you're finished cracking the cases (use the reassembly instructions above after you have repaired the problem). You can return to the engine repair section and select a topic related to the inside of the cases. Above, I talked about blowback marks on the piston. These marks show that combusting gas is escaping past the piston. This is generally not a huge problem, but it should be remedied. To fix this situation you should take the cylinder to a machine shop to be honed and the piston rings should be renewed. The rings will just continue to deteriorate and a loss of power will result. The piston showed no signs of heat seizing, but it is generally identifiable by oval shaped scratches up and down the piston head. If you note such marks, this represents the engine overheating or the cylinder out of tolerance. Replace the seals, have a shop hone the inside barrel and renew the rings to prevent further siezes. You should also inspect your carb and timing if these marks are observed. Consult a scooter shop for further assistance.


All Material Copyright 2001-2026 by Richard Hoar. Use at your own risk.
|