Cruciform Renewal
Ever riding up a hill and your bike surges or slips out of gear? This is often the fault of a component in the engine called the Cruciform (or spider). The cruciform is a small cross-shaped alloy part used to select gears. It works by fitting into square cut outs in the gears themselves. This is a high wear part. Since there is almost no buffering between the gears, this part receives damage with almost every shift. Sloppy shifting will expediate its demise. Luckily, this piece will not hurt the steel gears when it slips. Unfortunately, it is buried deep within the engine. To get at it, start by dropping the engine, then split the cases and follow the procedure below. Before you attempt this repair, check that your gear selector box does not have any side to side play. Sometimes this play will make the bike jump out of gear. Replace the gear selector box components and try to make the bike jump. If it doesn't jump, you have solved the problem. Otherwise change the cruciform and inspect the gear shims.
Tools & Parts Needed
Cruciform
Circlip Removal Tool
Red Grease Pencil
2 Feeler Guage Tools
Multi Screwdriver
Spark Plug Wrench
Disposeable Shop Towels
A can of Carb Cleaner
A Tube of Anti-Sieze Lubricant
13mm and 11mm Deep Socket
Torque Wrench (Absolutely neccessary, DO NOT perform without this item)
Plastic Bondo (Body Filler) Scraper
Plastic "Wire" Brush
Tub of All-Purpose / Bearing Grease ("Green Goop")
Procedure
|
|
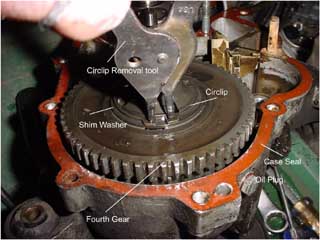
Step 1
First check the play in the gears. The gears should remain tight when jostled. To see a bad shim washer click here. More information about shim washers can be found below Using the circlip tool, remove the circlip around the rear axle. This will allow for the shim washer and the gears to be removed.
|
|
|
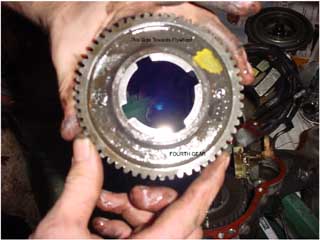
Step 2
Remove the shim washers and the gears. Marking the gears with a grease pencil will identify which side faces up when reassembling.
|
|
|
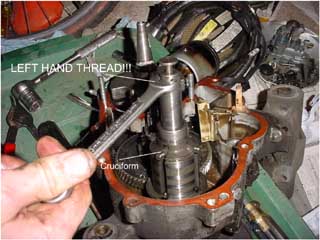
Step 3
You can now remove the selector rod, the rod washer and the cruciform. This shaft uses a left hand thread, meaning everything is backwards. To loosen turn clockwise, to tighten turn counter-clockwise.
|
|
|
Step 4
Sinch the lighting was pretty bad, we took the rear axle out of the engine to give you a better view of this part. You don't have to do this. For all this work, you can now treat yourself to a pickle. We certainly did :))
|
|
|
Step 5
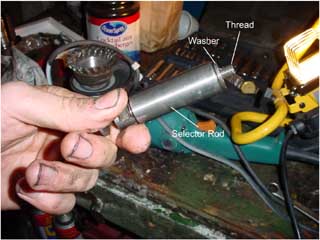
Here's the selector rod. It's a chunk of metal with a small washer on the end. The threaded piece threads into the cruciform.
|
|
|
Step 6
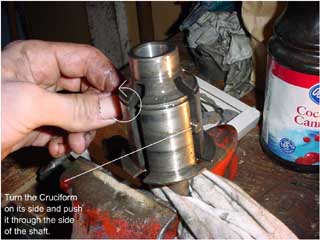
Turn the cruciform by hand until it is parallel with the rear axle slot. You can now just push the cruciform out through the side of the slot. place the new cruciform into the slot. The Cruciform will be fitted with the bend in the legs facing the rear wheel.
|
|
|
Step 7
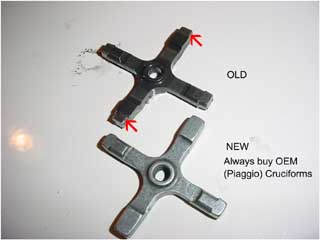
This picture illustrates the damage caused to the cruciform by shifting between the gears. Always use Piaggio cruciforms when replacing the old one. The cheaper parts tend to wear faster and do not have as pronounced of a bend making them hard to fit correctly.
|
The shim washer is incredibly important to the operation of the gears. You should make sure that this item is sound before closing the engine. To test the space use two feeler guage tools and place them under the shim washer. The allowable slack limit is 0.50mm (0.020 in). Oversizes are: Stock - 2.05mm (0.081in), 1st oversize - 2.20mm (0.087in), 2nd oversize - 2.35mm (0.093in), 3rd oversize - 2.50mm (0.098in), 4th oversize 2.65mm (0.104in). Once everything is in good condition, replace all the gears, the washer and the circlip. Then continue to reassemble the engine cases or continue to fix problems in the engine.


All Material Copyright 2001-2026 by Richard Hoar. Use at your own risk.
|